

Upload Projects
The complete Upload-project workflow in IronSled — choosing the Upload project type during onboarding, what gets provisioned, adding a container-upload repository, preparing a Docker image (docker save), uploading the image tar in the UI, and how images are scanned, published, and tracked by status.
An Upload project is for teams that already have prebuilt container images and need to bring them onto the IronSled platform to be scanned and published — without writing source code or running the platform's build pipeline. Instead of building images from a repository, you upload each image as a Docker image tar (.tar, .tar.gz, or .tgz) directly in the portal, and IronSled scans it with Trivy and publishes it to the internal registry automatically.
External vendors don't create their own Upload project. Your Upload project is created and onboarded for you by an IronSled program manager — you won't see the project-creation or onboarding option in the portal. The onboarding sections below (Choosing the Upload Project Type and What Gets Provisioned) describe what the platform does on your behalf; everything after that — adding container-upload repositories, preparing and uploading images, and tracking scan status — is the workflow you'll use once your project reaches Available status.
This guide walks the full Upload-project journey end to end:
- Choose the Upload project type during onboarding.
- Submit the short onboarding form (no AI, no source code to plan).
- Provisioning creates the project, its team, and an upload repository.
- Add a container-upload repository for each container you'll bring in.
- Prepare your Docker image with
docker save. - Upload the image in the Containers section.
- Scanning, publishing, and status — track each version as it goes live.
- Deploy and test — publishing an image is not running it; author a Helm chart, request an environment, and roll out your app so you can test it.
Upload projects use the same sections as Code / Build projects (Overview, Team, Repositories, Containers, Environments, Tickets, Reports & Artifacts, Settings) — they differ only in how images arrive: uploaded rather than built. External vendors are typically onboarded as Upload projects by an IronSled program manager on their behalf.
Choosing the Upload Project Type
Project creation starts on the AI-Assisted Onboarding screen (open Project Onboarding from the project list). At the top, a Project Type toggle chooses how the project is provisioned:
| Option | Icon | For |
|---|---|---|
| Code / Build | code-branch | Teams building software on the platform — source repositories, CI/CD, containers, environments, and the full delivery pipeline. |
| Upload | cloud-upload | Teams bringing prebuilt container images — no source code or build pipeline. |
Select Upload. The helper text confirms the choice: "Upload projects are for external users bringing prebuilt container images — no source code or build pipeline," and an information banner explains what happens next: "We'll create the project, its team, and an upload repository for your prebuilt container images. The upload experience itself is provisioned after onboarding."
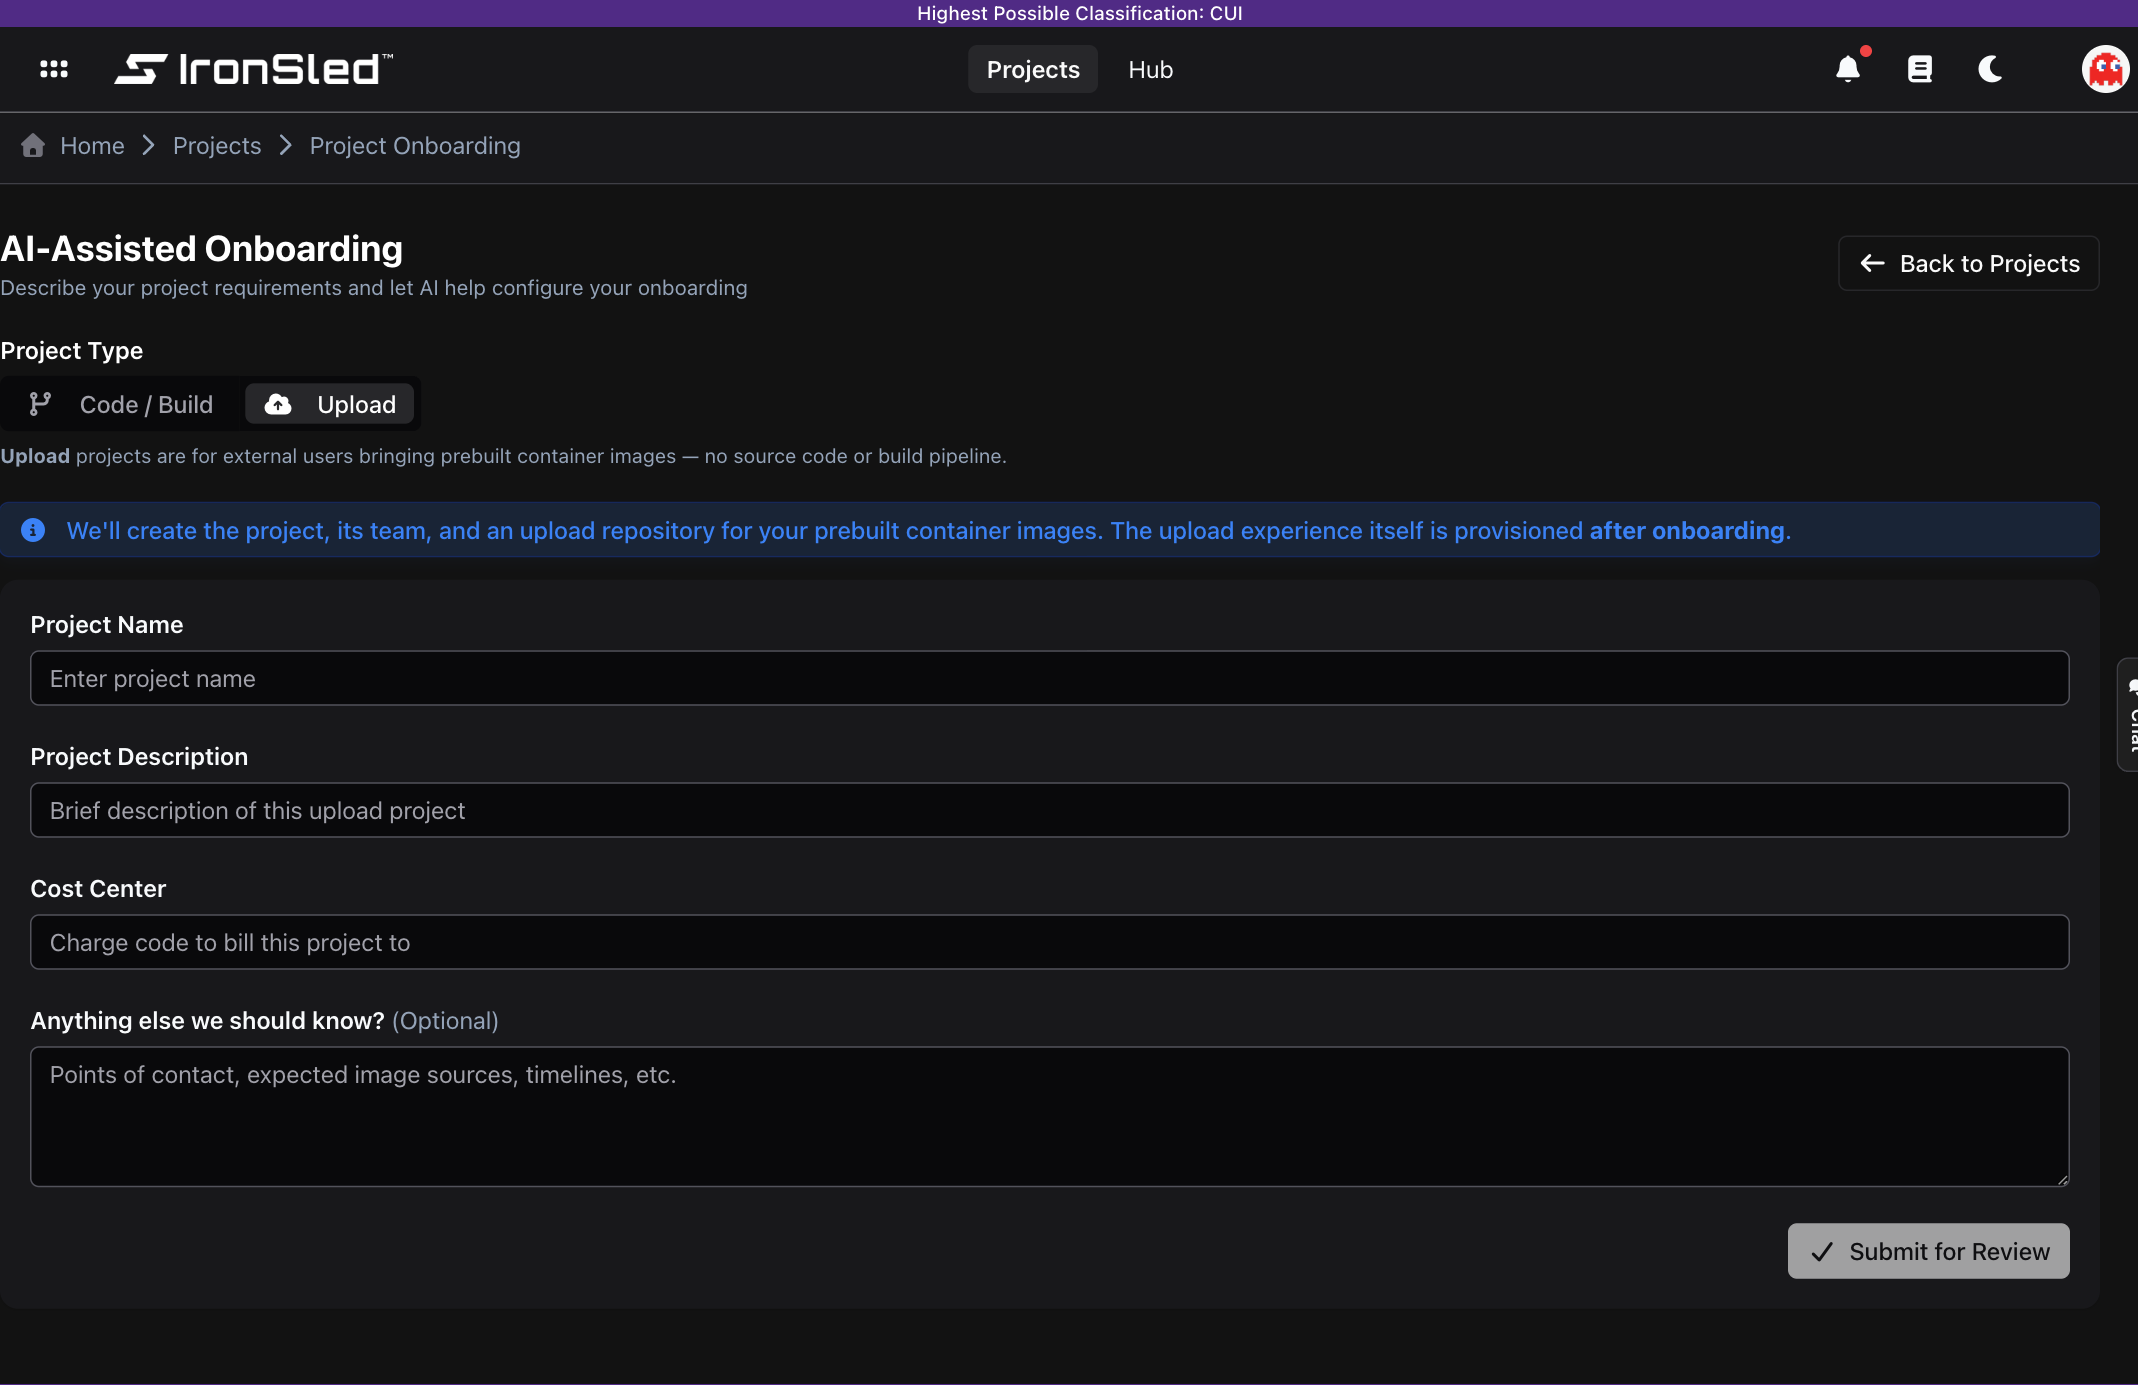
Because there is no source code or build architecture to plan, Upload onboarding is a short manual form — there is no AI-assisted configuration and no CUI question. The form has four fields:
| Field | Required | Notes |
|---|---|---|
| Project Name | Yes | At least 3 characters. |
| Project Description | Yes | A brief summary of the application. |
| Cost Center | Yes | The charge code the project is billed to. |
| Anything else we should know? | Optional | Points of contact, expected image sources, timelines, or anything else useful to the platform team. |
Click Submit for Review (enabled once the name, description, and cost center are filled in). The project is created with status Submitted, you see a "Project Submitted" confirmation, and reviewers are notified. From here it follows the same lifecycle as any project — Submitted → Reviewing → Implementing → Available.
What Gets Provisioned
When the platform team approves the request, the project moves to Implementing and IronSled provisions it automatically. Access provisioning is identical to a Code / Build project; only the repositories differ.
For every project type, provisioning creates:
- Okta groups for each access level (owners, developers, etc.), keyed to the project path.
- A GitLab group under the platform's parent organization, with SAML group links mapping Okta groups to GitLab permissions.
- Member synchronization — team members added to the matching Okta and GitLab groups at their assigned role.
For an Upload project specifically, instead of source-code repositories it provisions:
- A
container_uploadsrepository, where uploaded images and their scan artifacts are organized. - A Helm chart repository the team populates with its own Helm chart and README. External vendors are required to provide their own chart (internal teams get help building one) — it is what the application is deployed from when you later run it. See From Published Image to Running App.
When all setup tasks complete, the project status changes to Available and the team is notified. Each task's status (pending, in progress, complete, or failed) is visible on the project's onboarding timeline.
Adding a Container-Upload Repository
In an Upload project, each container is backed by a container-upload repository. On the platform's one repository = one container model, creating a container-upload repository automatically creates a matching container — there is no separate "associate container" step.
Open the project's Repositories section and click Add Repository. For an Upload project the repository type is fixed to container-upload (repositories are homogeneous per project — you don't choose a type), and the Add Repository dialog opens with these fields:
| Field | Notes |
|---|---|
| Repository Name | The display name; typing it auto-generates the path. |
| Path (URL slug) | Lowercase, dashes only, no special characters. |
| Template | Read-only, shown as External Containers Project — "Set by the project type — repositories are homogeneous per project." You don't choose it; it is fixed by the Upload project type (the container-upload template). |
| Description | Optional. |
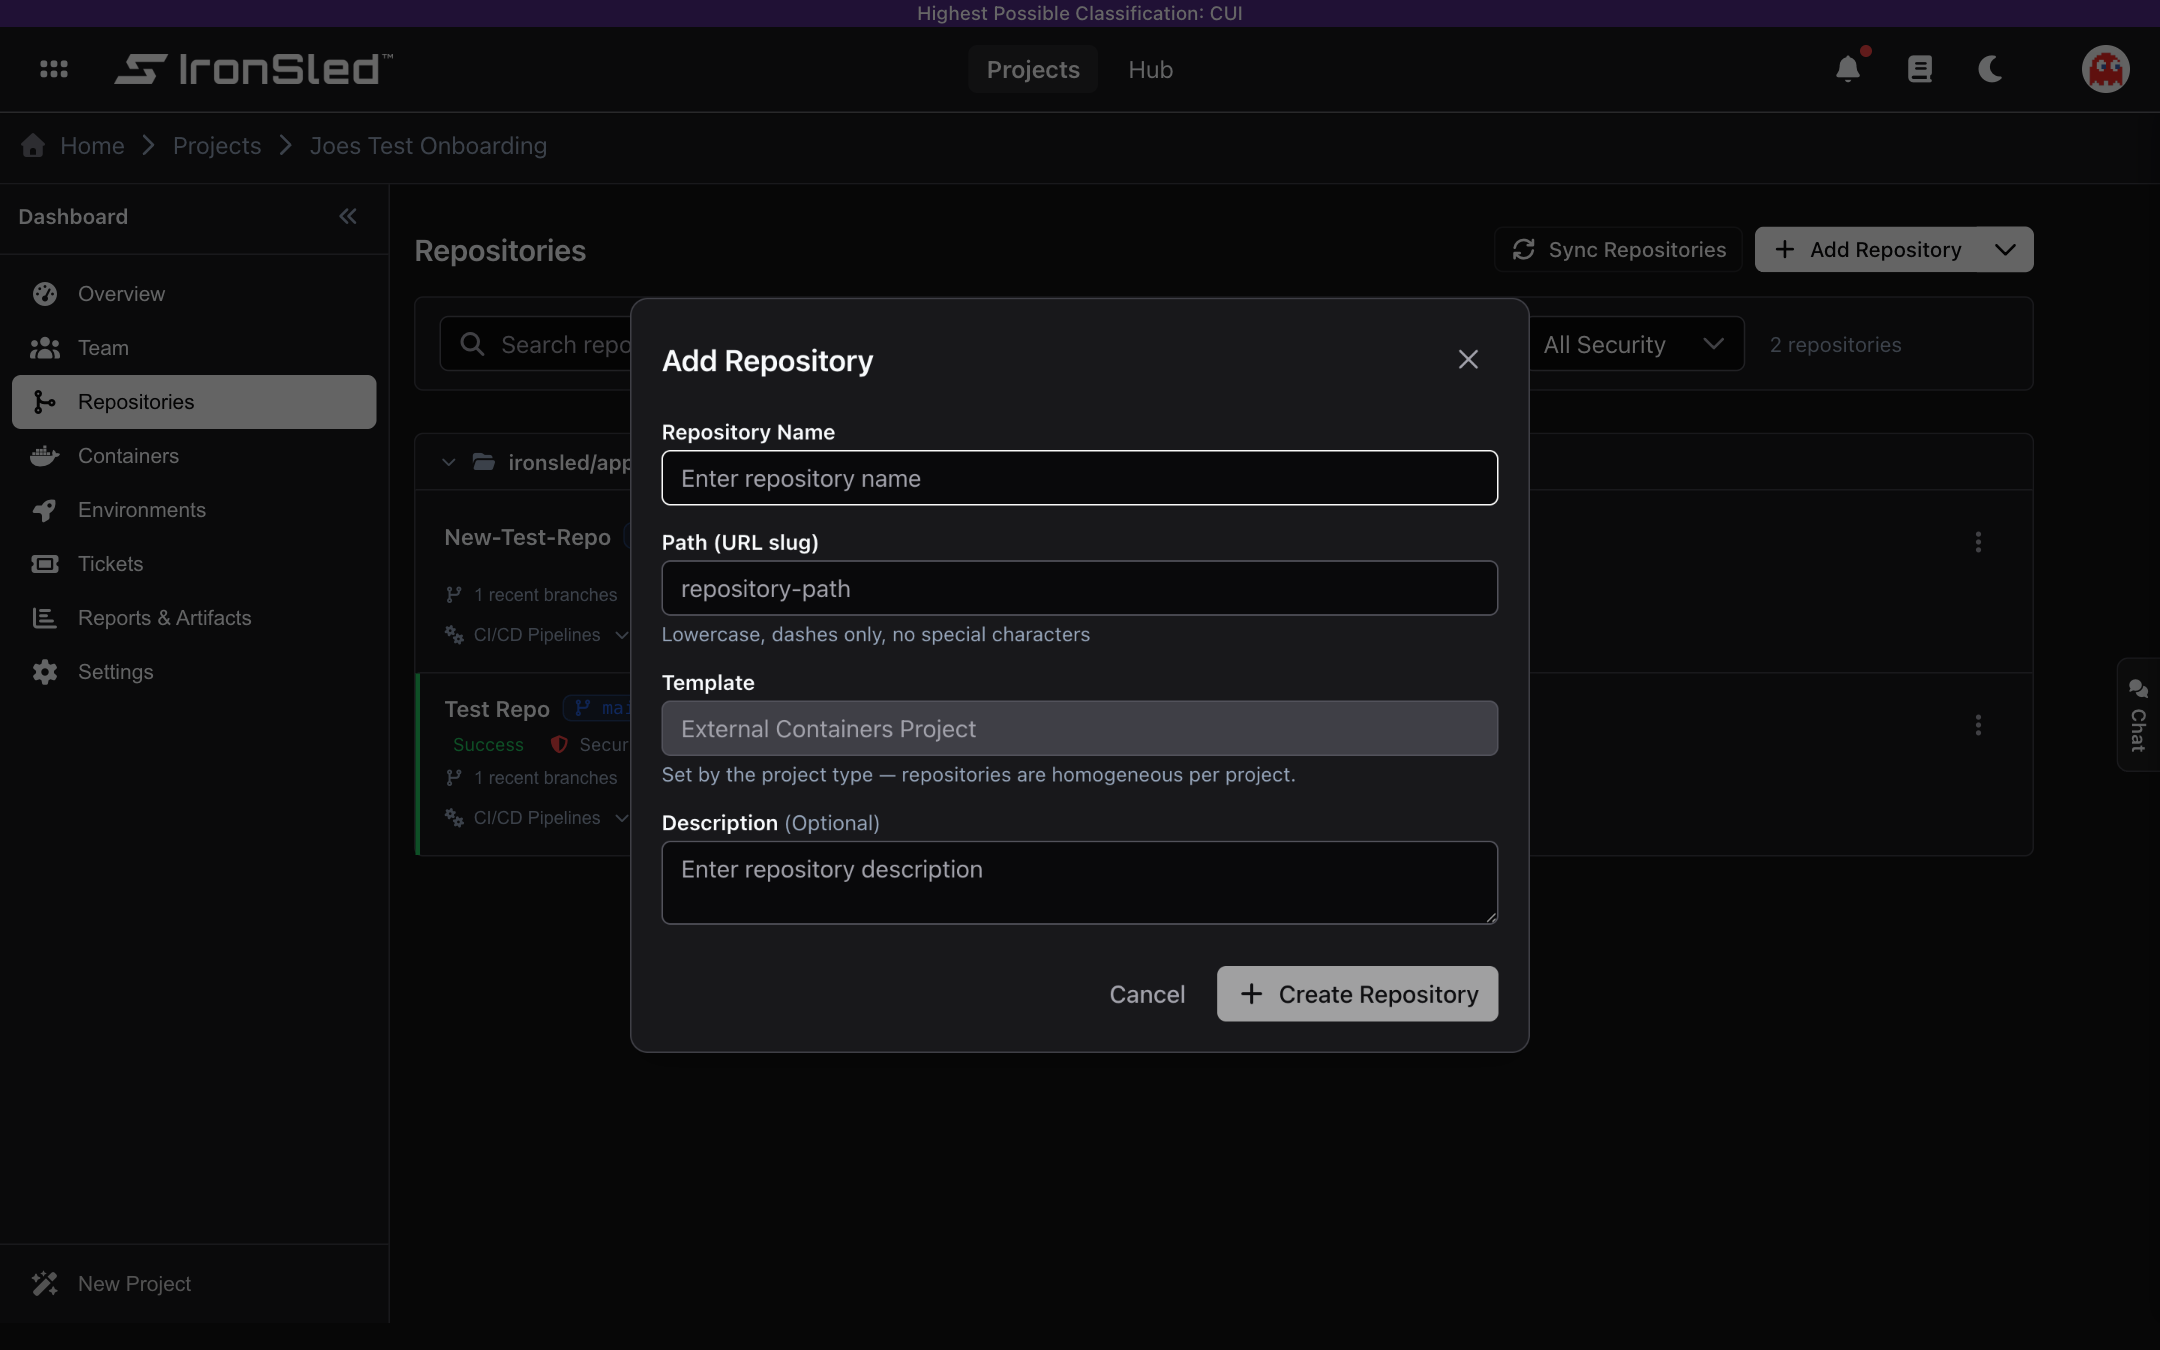
Click Create Repository. IronSled creates the repository (private, initialized with a README, default branch main) and associates it with the project, confirming with "Repository was successfully created and associated to the project." The new container-upload repository immediately appears in the Containers section as a container, ready to receive images.
You can also Associate Existing Repository (from the Add Repository split-button menu) to link a container-upload repository that already exists in GitLab, and Sync Repositories to reconcile the list with GitLab. See Repositories for the full repository model.
Preparing Your Docker Image
Uploads take a Docker image saved as a tar. Save it with docker save, and — recommended — gzip it so the upload is much faster and smaller.
Save an image to a tar:
docker save myapp:1.0 -o myapp.tarSave and compress in one step (smaller, faster upload — typically 2–5× smaller):
docker save myapp:1.0 | gzip > myapp.tar.gzThe Containers section includes a collapsible "New to this? How to prepare your Docker image for upload" help panel with these same steps. Accepted file types are .tar, .tar.gz, and .tgz; any other file is rejected with "Please select a Docker image tar (.tar, .tar.gz, or .tgz)."
Uploading the Image
Open the project's Containers section. Each container-upload repository appears here as a container; expand one to see every uploaded version, its scan status, and where it runs. If a container has no images yet, its card shows "No images uploaded yet" with an Upload image button; a container that already has versions shows an Upload button in its header.
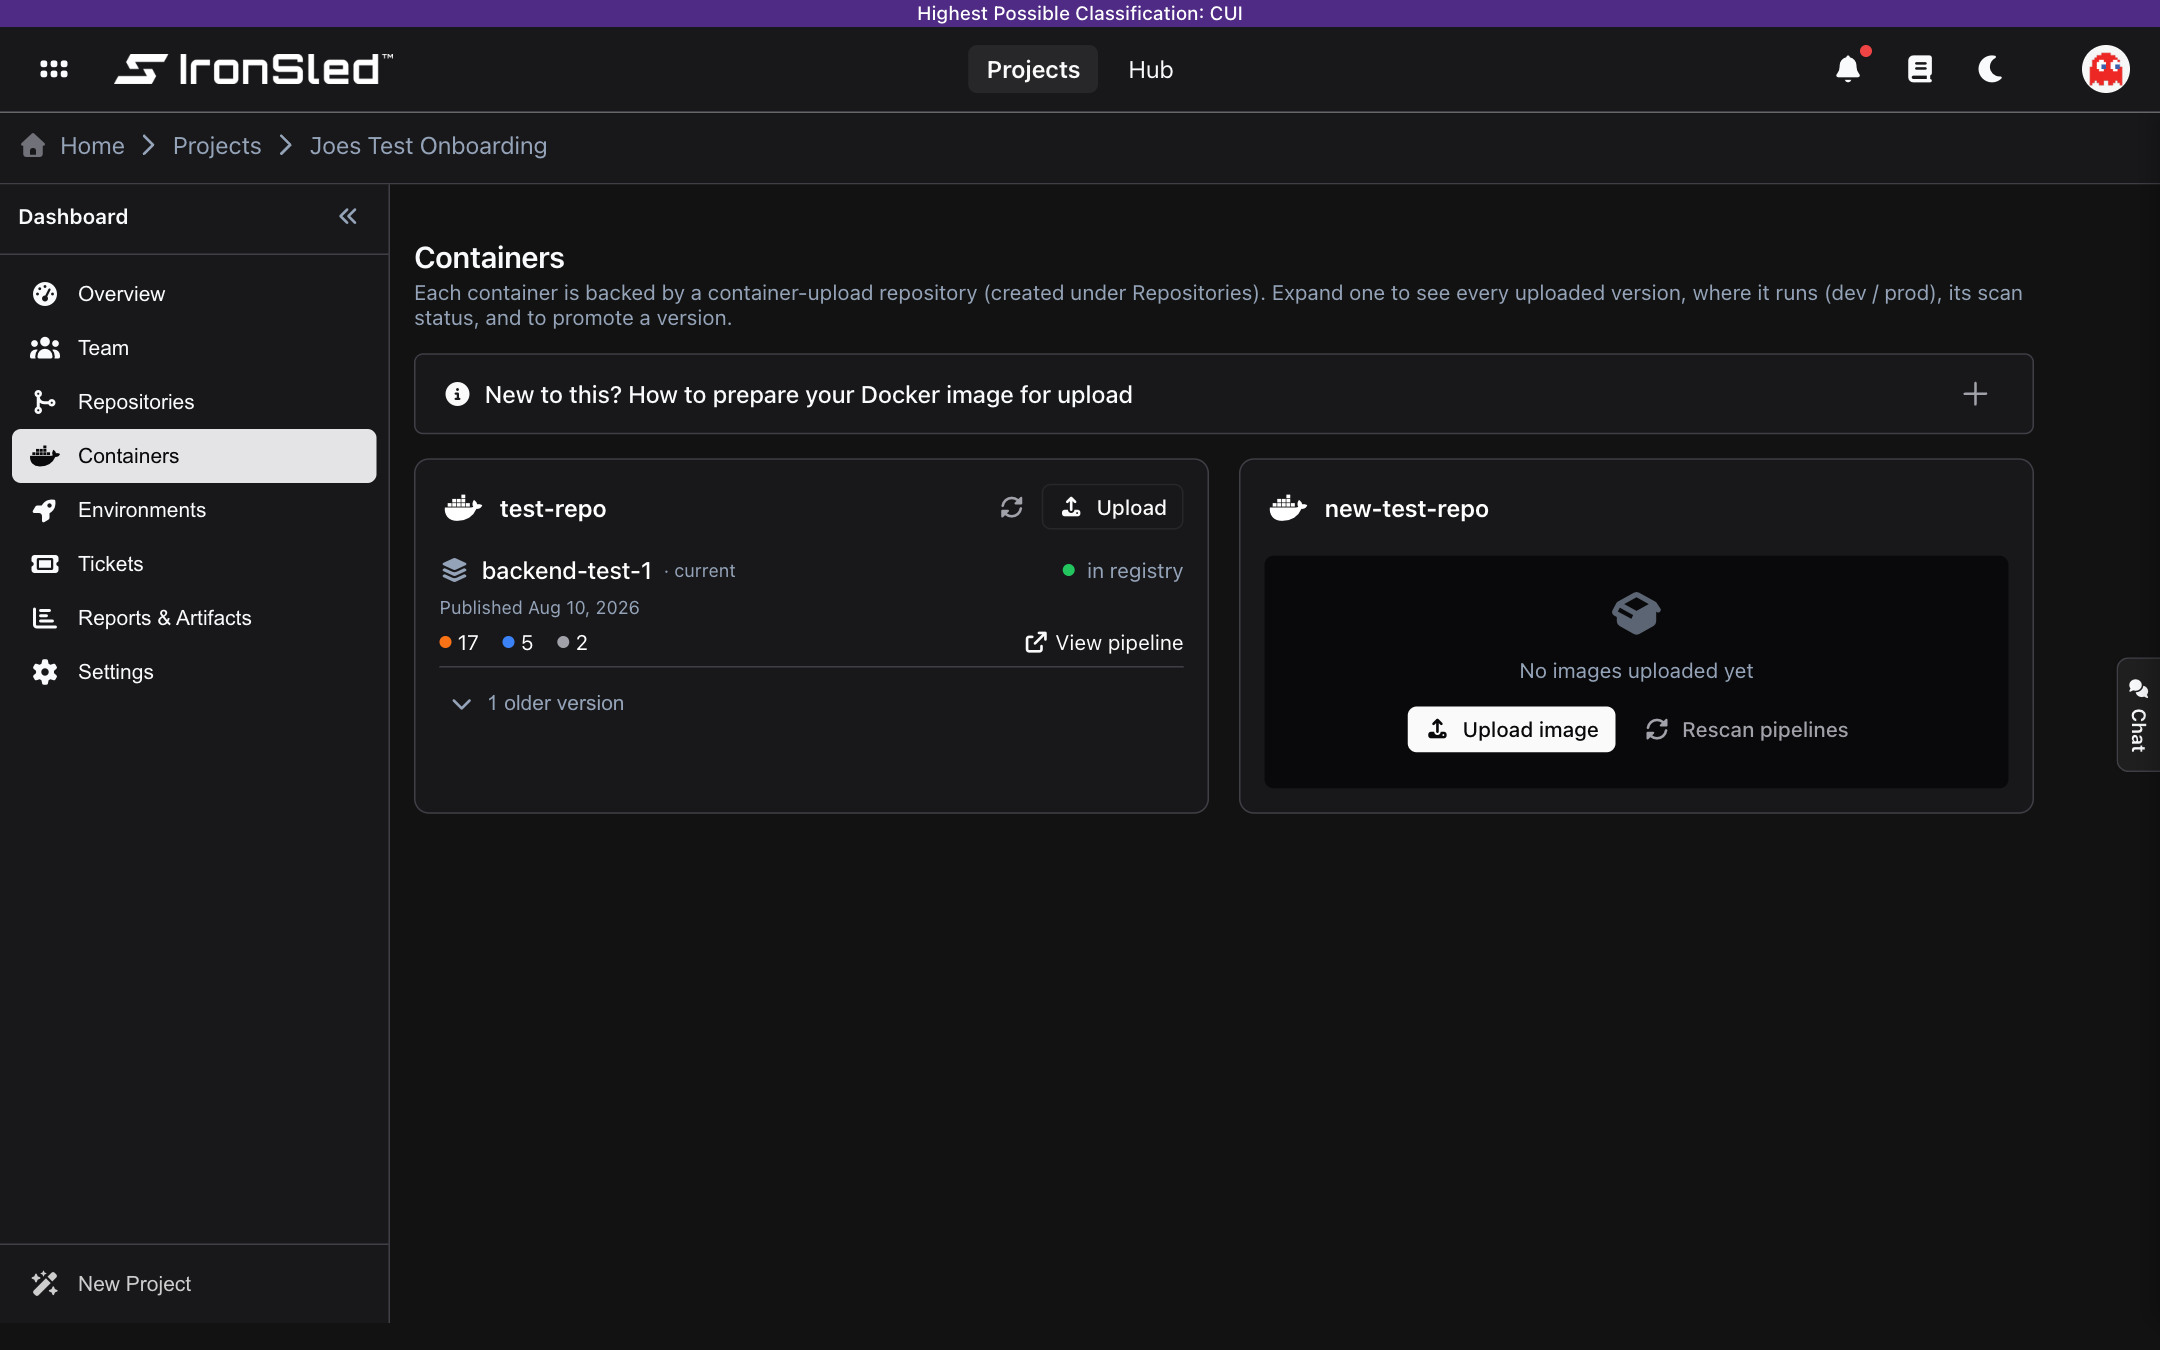
Click Upload (or Upload image) to open the Upload image drawer, titled for the container:
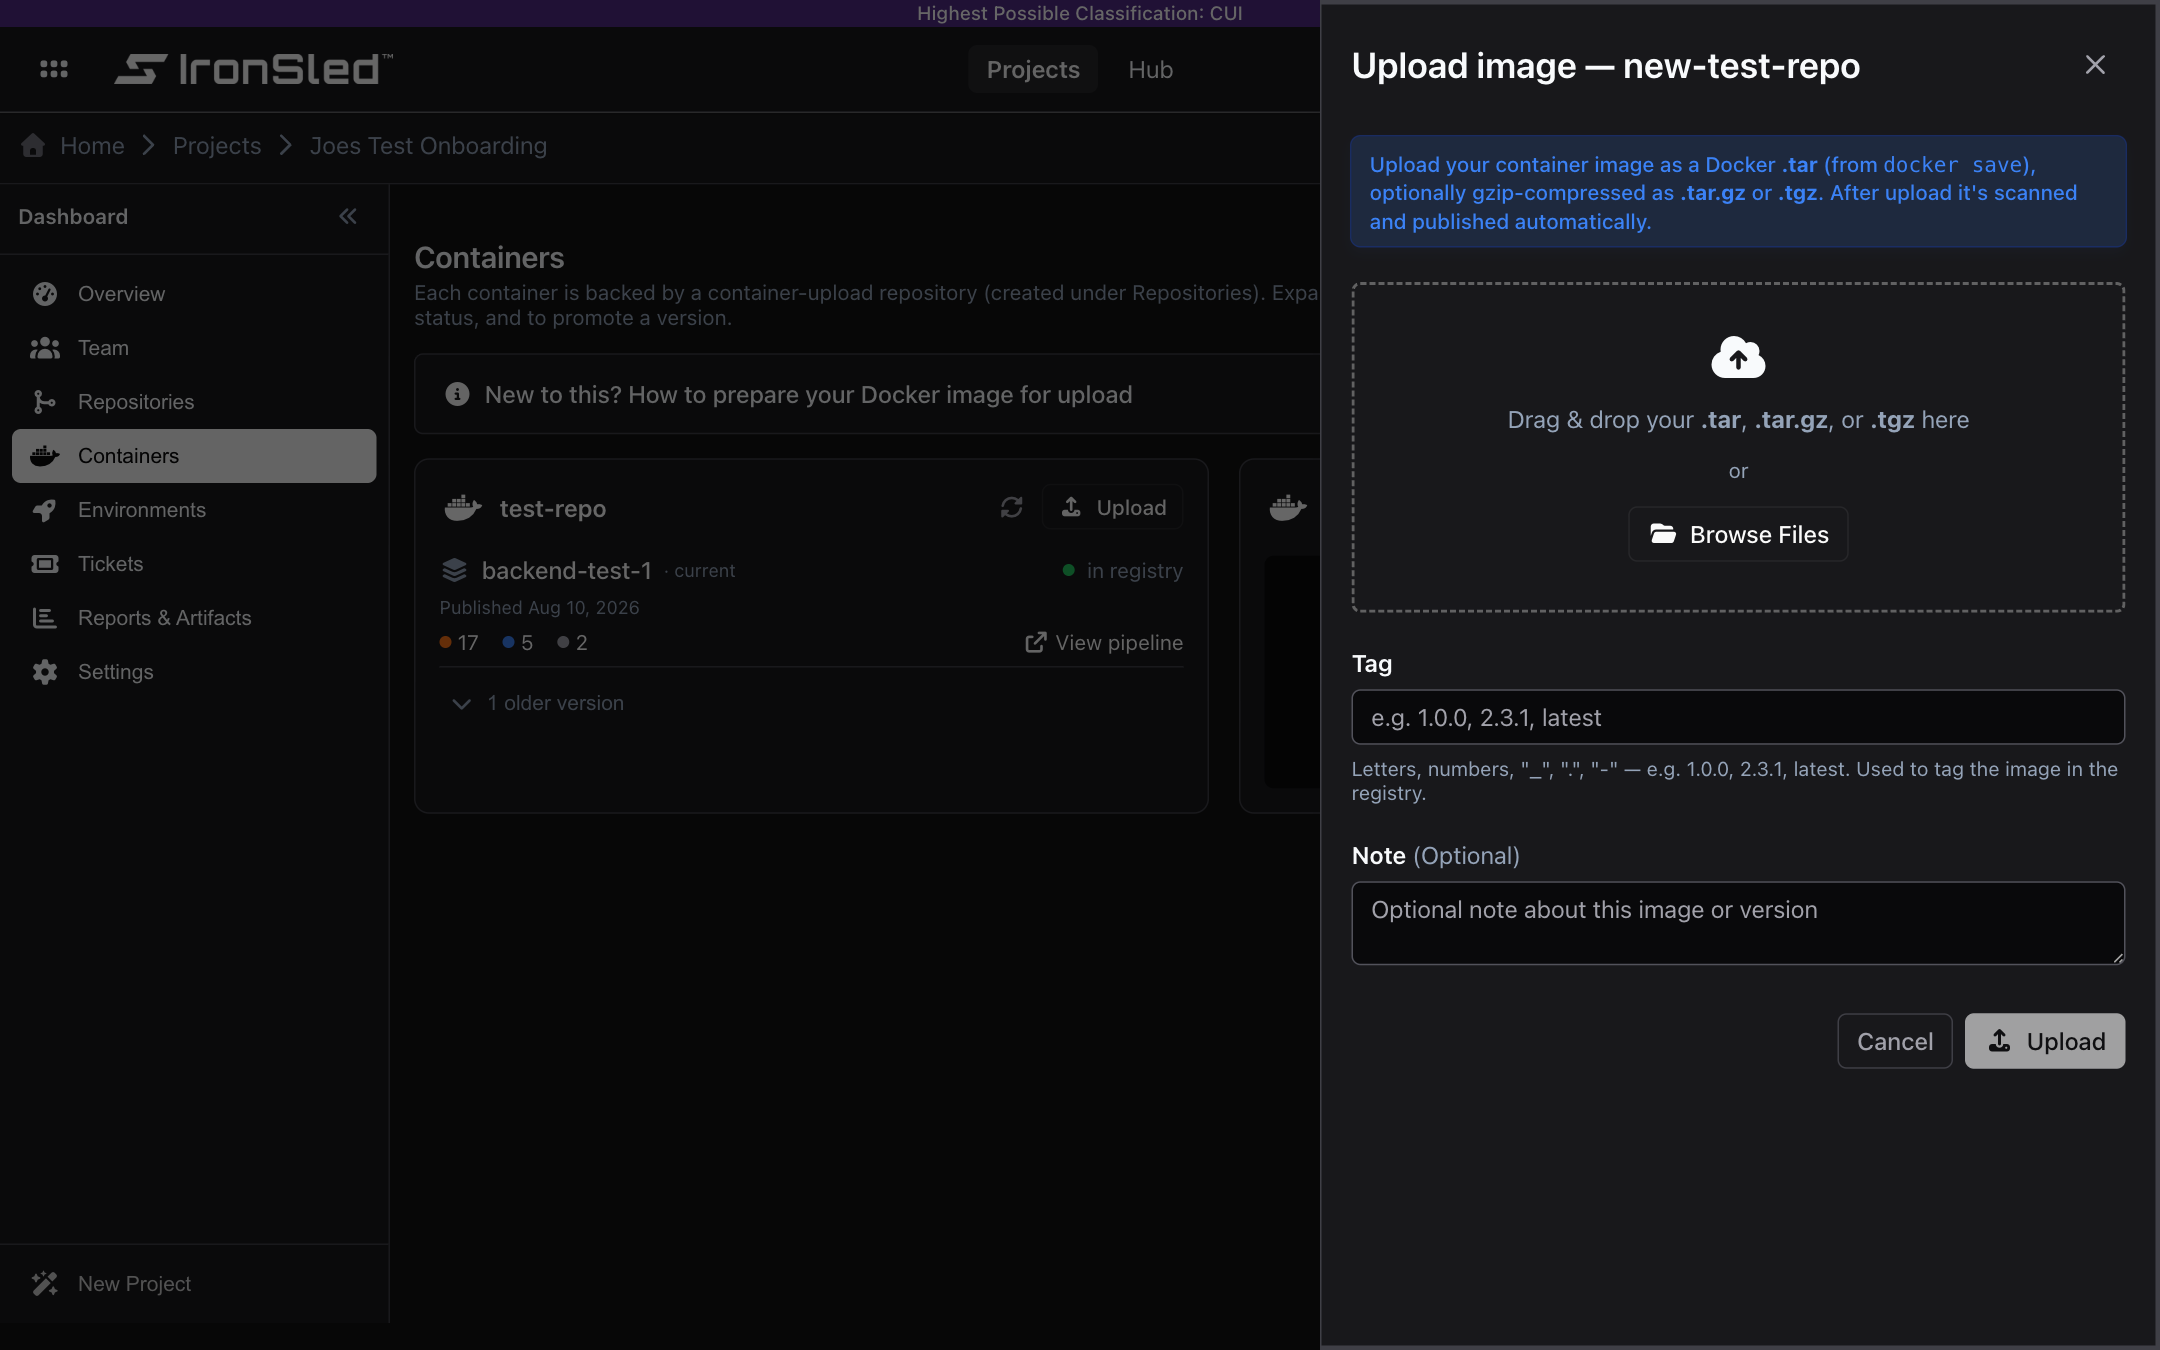
- Add the file. Drag and drop your image onto the dropzone ("Drag & drop your .tar, .tar.gz, or .tgz here") or click Browse Files. The selected file's name and size are shown, with an option to remove it.
- Enter a Tag. For example
1.0.0,2.3.1, orlatest. Tags may use letters, numbers,_,., and-, up to 128 characters, and cannot start with.or-. This is the tag the image gets in the registry. - Add a Note (optional) — a short note about this image or version.
- Click Upload.
The drawer shows live progress (Preparing… → Uploading… → Finalizing…) and cannot be dismissed while an upload is in progress — use Cancel upload to stop it. When it finishes you see "Upload Complete," and the drawer closes. The image is then scanned and published automatically — you do not trigger a pipeline yourself.
You need write access to the container-upload repository to upload an image. The Upload button is disabled while a pipeline is already processing that container ("Wait for it to finish before uploading a new image").
Scanning, Publishing, and Status
After an upload, IronSled runs the image through the pipeline — build/scan/publish — and each version shows a status reflecting where it is in that lifecycle. Expand a container to see its version history, newest first; the latest is marked · current.
| Status | Meaning |
|---|---|
| uploaded | Uploaded, waiting to be scanned. |
| scanning | A pipeline is building, scanning, or publishing the image. The live phase is shown (building, scanning, publishing, cleaning up), with a View pipeline link to GitLab. |
| staged | Scanned and staged, pending publish. |
| in registry | Published to the registry and available to pull. |
| scan failed | The scan did not complete. |
| upload failed | The upload did not complete. |
Each version also shows its Uploaded or Published date and its scan results — either No issues or a severity breakdown (Critical / High / Medium / Low). For an uploaded image, a View pipeline link opens the build in GitLab; the scan report ("Pipeline scan — container:version") shows the full Trivy findings — each CVE with its package, installed and fixed versions, severity, and title.
Status updates arrive live as the pipeline runs, and a scheduled reconciliation job advances any in-flight uploads to their final state and caches their scan summaries — so you do not need to refresh manually.
Recovering Missing Versions
If versions are missing — for example, images published before they were tracked, or a pipeline that did not report back — a Rescan pipelines action (available to platform managers) backfills image versions from the project's GitLab pipeline history.
Permissions
| Action | Who can do it |
|---|---|
| View containers and versions | All project members |
| Add a container-upload repository | Project members with permission to create repositories |
| Upload an image | Project members with write access to the container-upload repository |
| Rescan pipelines / recover history | Platform managers |
From Published Image to Running App
Uploading, scanning, and publishing an image makes it available in the registry — it does not deploy or run it. To actually run your application on IronSled so you can test it, two things are required beyond the upload:
- Your own Helm chart. The Helm chart repository provisioned during onboarding is where you commit your own Helm chart and a README — external vendors are required to provide their chart (internal teams get help building one). This chart is what your application is deployed from, and it should deploy your published images by referencing them from the internal registry.
- An environment. Every project starts with a dev environment by default; to promote your application up through stage and prod, request the next environment from your project's Environments section. Once your chart is committed and the request is in, the IronSled platform team stands up the application and grants you access to roll it out by restarting the deployment in Rancher.
For the full deploy-and-test path, see Deploy & Troubleshoot.
Related Pages
- Create a Project — onboarding for both project types, including the review and provisioning lifecycle.
- Repositories — the full repository model, sync, and the Add Repository / Associate flows.
- Containers — the Containers section reference for both code and upload projects.
- Deploy & Troubleshoot — how an upload project is deployed and tested once its images are published.
- Environments — request and monitor the environment your app runs in.
Create a Project
How to create and onboard a project onto IronSled — the AI-assisted flow for Code/Build projects, the simple form for Upload projects, platform review, automated provisioning, and activation.
Manage Your Team
Managing project team members — adding and removing users, assigning roles, setting a Point of Contact, and how roles map to Okta groups and GitLab permissions.