

Environments
Linking Rancher clusters and namespaces to a project — viewing deployments, pod health, ingress routing, and runtime security vulnerabilities from the Trivy Operator.
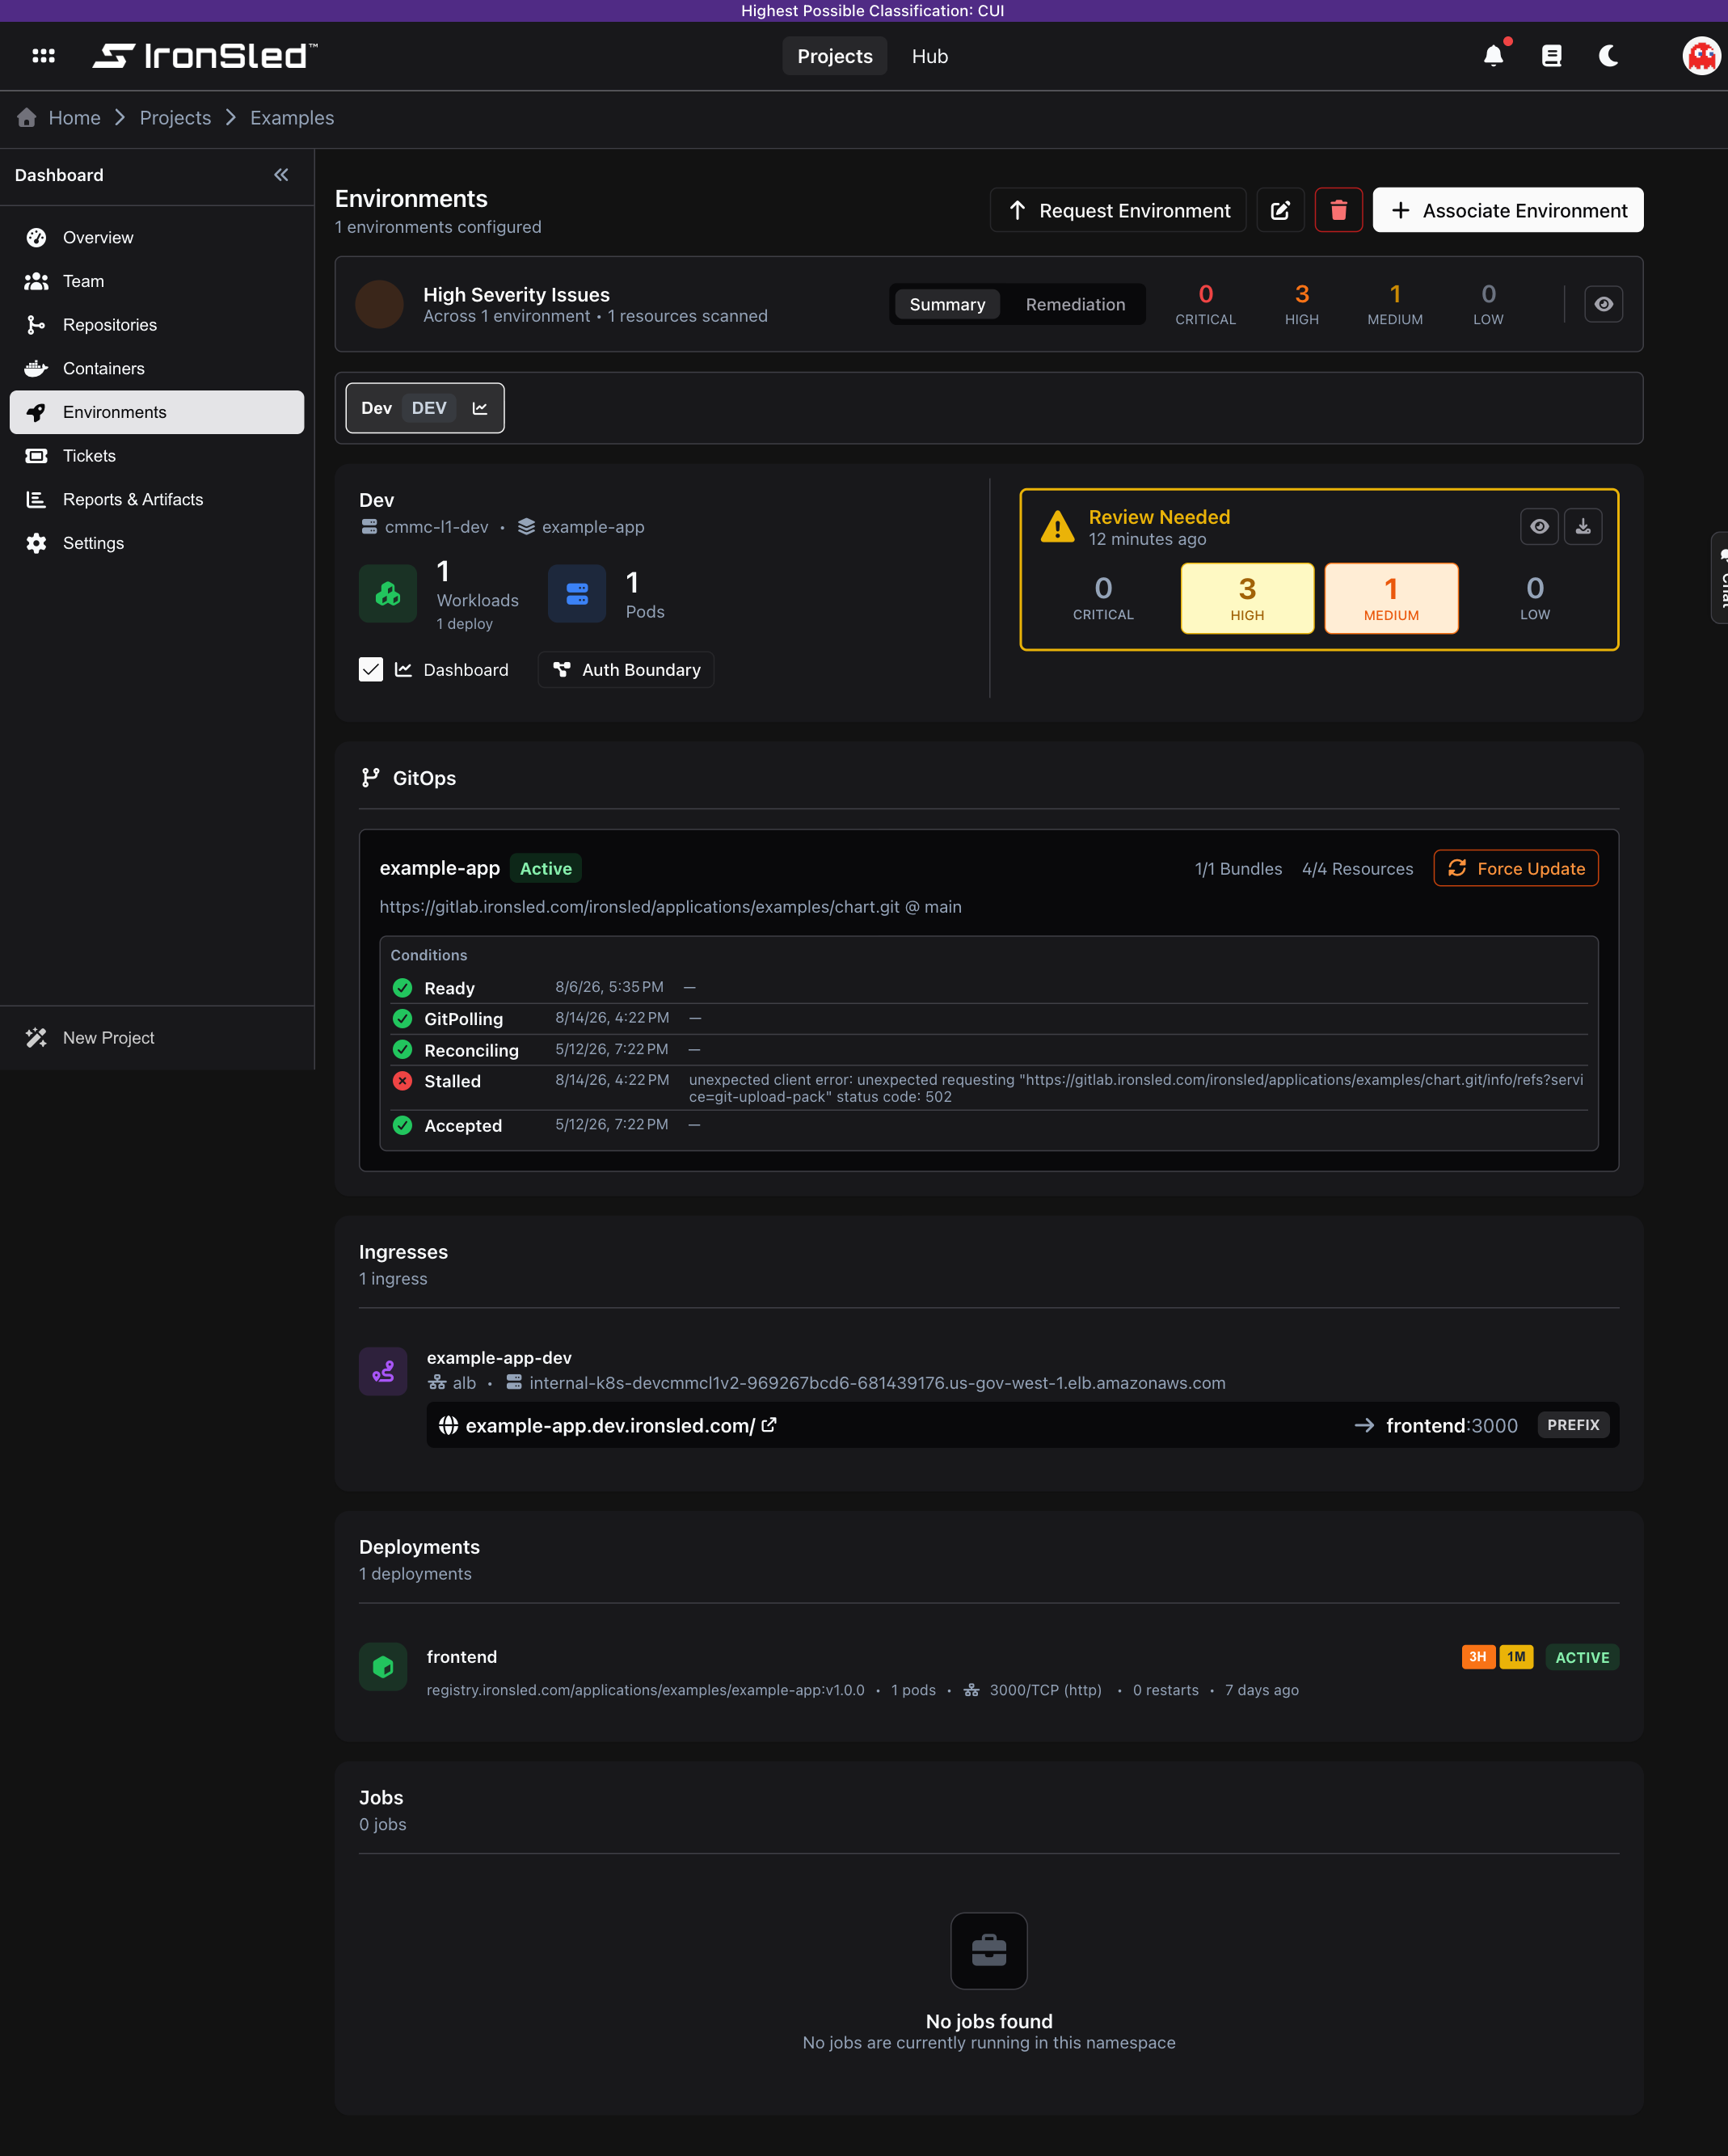
The Environments section connects a project to its Kubernetes deployment targets. By linking a Rancher-managed cluster and namespace to the project, IronSled pulls real-time data about running workloads, pod health, ingress routing, and runtime security vulnerabilities — giving the team a single place to see what is deployed, whether it is healthy, and whether it is secure.
What an Environment Represents
An environment in IronSled maps to a Kubernetes namespace running inside a Rancher-managed cluster. Each environment is tagged with a type — Development, Staging, QA, UAT, Production, or Other — and can optionally feed metrics into the project dashboard.
A project can have multiple environments. A typical setup might include a development namespace for active work, a staging namespace for pre-release testing, and a production namespace for live traffic.
Adding an Environment
To link an environment to a project:
- Navigate to the project's Environments section.
- Click Add Environment (requires Platform Manager permission).
- In the dialog, select:
- Rancher Server — Choose from the platform's configured Rancher instances.
- Cluster — Select the Kubernetes cluster (loaded from the chosen Rancher server).
- Namespace — Select the namespace within the cluster.
- Environment Type — Classify the environment: Development, Staging, QA, UAT, Production, or Other.
- Optionally set a Display Name (defaults to the namespace name).
- The Include in Dashboard toggle is enabled by default — this controls whether the environment's metrics contribute to the project dashboard KPIs.
- Click Save.
The environment is linked to the project and IronSled begins pulling data from Rancher.
Requesting an Environment
Any project member can request a new environment for their project. The request is submitted to the platform team for review and provisioning.
- Navigate to the project's Environments section.
- Click Request Environment. A side panel opens with a structured form.
- Fill out the request:
- Target Environment — Select the environment type to create: Development, Testing, Staging, Production, or Demo. Environment types that already exist for the project are excluded from the list.
- Justification — Explain why this environment is needed and how the team will use it. A minimum of 20 characters is required.
- DNS Subdomain (optional) — If the environment needs a public-facing URL, provide a subdomain name. IronSled shows a preview of the resulting URLs for each level (e.g.,
my-app.dev.ironsled.comandmy-app.gov.ironsled.com). - Containers — Define the containers that will be deployed in this environment. For each container, provide:
- Name — A descriptive name for the container (e.g.,
api,web-client,worker). - Image — The Docker image to deploy (e.g.,
registry.ironsled.com/project/api:latest). - Port — The port the container exposes.
- Entry Point — Mark one container as the entry point — this is the container that receives external traffic through the ingress.
- Name — A descriptive name for the container (e.g.,
- Networking Requirements (optional) — Describe any special networking needs such as subnets, firewall rules, or VPN access.
- Priority — Set the urgency of the request: Low, Medium, or High.
- Additional Notes (optional) — Any other context or requirements for the platform team.
- Click Submit Request.
If the project already has environments with containers configured, the form offers a Use Existing shortcut that pre-fills the container list from the project's current deployments. This saves time when requesting a new environment that mirrors an existing one.
The request is routed to the platform team through the resource request system. The team is notified when the request is submitted, and the requesting team member receives updates as the request progresses through review and provisioning.
Requesting a Change
For non-development environments, all modifications go through a formal change request process. When a non-development environment is selected, the Request Change button becomes available.
- Click Request Change. A side panel opens with the change request form.
- Fill out the request:
- Change Type — Select the category of change:
- Deployment — Deploying a new version or updating an existing deployment.
- Configuration Change — Modifying environment variables, settings, or configuration maps.
- Infrastructure Change — Changes to the underlying infrastructure such as scaling, networking, or storage.
- Description — Describe the change in detail. A minimum of 20 characters is required.
- Risk Level — Assess the risk: Low, Medium, or High.
- Rollback Plan — Describe how the change will be reverted if something goes wrong. This field is required.
- Affected Services (optional) — If the environment has multiple containers, select which services will be impacted by the change.
- Preferred Schedule (optional) — Specify a preferred date and time for the change to be applied.
- Change Type — Select the category of change:
- Click Submit Change Request.
The platform team reviews the change request and coordinates the implementation. Development environments are excluded from this process — teams can deploy directly to development without platform team approval.
Removing an Environment
To remove an environment from the project:
- Select the environment using the tab pills.
- Click the Delete button (requires Platform Manager permission).
- Confirm the removal. The confirmation shows the cluster, namespace, and display name for verification.
This removes the environment from IronSled only. Nothing is changed in Rancher or Kubernetes.
Environment Overview
Each environment displays a summary panel with:
- Environment type — Shown as a colored badge (Production in red, Staging in orange, QA/UAT in blue, Development and Other in neutral tones).
- Cluster and namespace — The Rancher cluster and Kubernetes namespace the environment points to.
- Deployment count — How many workloads (Deployments, StatefulSets, DaemonSets) are running.
- Pod count — Total number of pods across all workloads.
- Security summary — Runtime vulnerability status for the environment.
Dashboard Inclusion
The Include in Dashboard toggle controls whether an environment's metrics feed into the project dashboard. When enabled, the environment's pod health, runtime vulnerabilities, and uptime contribute to the project's overall KPIs. When disabled, the environment is still visible in the Environments section but does not affect the dashboard scores.
This is useful for excluding development or experimental environments that would skew the project's health metrics.
Deployments
The Deployments section lists every workload running in the namespace. This includes Kubernetes Deployments, StatefulSets, and DaemonSets.
For each workload, the view shows:
| Field | Description |
|---|---|
| Name | The workload name, clickable to open in Rancher. |
| Image | The container image the workload is running. |
| Pods | Number of ready pods out of the total desired (e.g., 3/3). |
| Ports | Container ports exposed by the workload. |
| Restarts | Total container restart count across all pods. |
| State | Current status — Active, Updating, Error, or Inactive. |
| Last Updated | When the most recent pod was created. |
| Vulnerabilities | Compact severity badges from the Trivy operator scan (C, H, M, L). |
Workload States
| State | Meaning |
|---|---|
| Active | All desired replicas are ready and available. |
| Updating | A rollout is in progress — some pods are not yet ready. |
| Error | The deployment has hit a progress deadline or is in a failure state. |
| Inactive | The workload is scaled to zero replicas. |
Jobs
Kubernetes batch Jobs in the namespace are listed separately from long-running workloads.
For each job, the view shows:
| Field | Description |
|---|---|
| Name | The job name, clickable to open in Rancher. |
| Image | The container image used by the job. |
| Status | Pending, Running, Completed, or Failed. |
| Completions | Succeeded count out of the desired completions (e.g., 1/1). |
| Failed | Number of failed attempts. |
| Completed At | When the job finished (if completed). |
| Vulnerabilities | Compact severity badges from the Trivy operator scan. |
Ingresses
The Ingresses section shows the network routing rules configured for the namespace.
For each ingress:
- Ingress name — Clickable to open in Rancher.
- Ingress class — The ingress controller handling the rules (e.g.,
nginx). - Load balancer — The IP address or hostname assigned by the cloud provider.
- TLS status — Whether TLS is configured for the ingress.
Each ingress lists its routing rules:
| Field | Description |
|---|---|
| URL | The host and path combination (e.g., app.example.com/api), clickable to open in a browser. |
| Target service | The Kubernetes service and port the rule routes to. |
| Path type | How the path is matched — Exact, Prefix, or ImplementationSpecific. |
Runtime Security
IronSled integrates with the Trivy Operator, which runs inside each Kubernetes cluster and continuously scans running container images for known vulnerabilities. Unlike pipeline scanning (which checks images at build time), runtime scanning checks what is actually deployed and running.
Security Summary
Each environment shows a security summary with:
- Overall status — A shield icon indicating the highest severity found:
- Critical — Red shield. Vulnerabilities requiring immediate attention.
- High — Orange shield. Serious vulnerabilities that should be prioritized.
- Medium — Yellow shield.
- Low — Gray shield.
- Passed — Green shield. No vulnerabilities detected across all scanned resources.
- Not Scanned — The Trivy Operator has not produced reports for this namespace.
- Vulnerability counts — Total count for each severity level (Critical, High, Medium, Low).
- Resources scanned — How many workloads the Trivy Operator has scanned.
- Last scanned — When the most recent scan completed.
Project-Level Security Rollup
At the top of the Environments section, a project security summary aggregates vulnerability data across all environments. This gives project owners a single view of their runtime security posture.
The rollup shows the same severity breakdown but across every environment, with a note showing how many environments and resources were included.
Viewing the Full Report
Click View Details on the security summary to open the full vulnerability report. The report dialog shows:
- Summary header — Total counts by severity across all environments.
- Per-environment breakdown — An accordion section for each environment with its own vulnerability table.
The vulnerability table includes:
| Column | Description |
|---|---|
| Severity | Critical, High, Medium, or Low. |
| CVE ID | The vulnerability identifier (e.g., CVE-2024-1234), linked to the CVE database. |
| Package | The affected software package. |
| Installed Version | The version currently in the running image. |
| Fixed Version | The version that resolves the vulnerability (if a fix is available). |
| Image | The container image where the vulnerability was found. |
Downloading a Security Report
Click Download Report to export the vulnerability data as a CSV file. The export includes all vulnerability details across all environments — useful for compliance reporting and security review meetings.
Vulnerability Tracking
IronSled tracks the lifecycle of each vulnerability over time:
| Status | Meaning |
|---|---|
| New | First discovered in the current scan. |
| Active | Previously detected and still present. |
| Resolved | No longer found — the image was updated or the package was patched. |
| Reintroduced | Was previously resolved but has reappeared (regression). |
This tracking is maintained in the database, recording when each vulnerability was first detected, last seen, and how many times it has been reintroduced.
How Environments Feed the Dashboard
When an environment has Include in Dashboard enabled, its data contributes to three project dashboard KPIs:
- Pod Health — The ratio of healthy pods to total pods across all dashboard-included environments.
- Runtime Vulnerabilities — Aggregated vulnerability counts from the Trivy Operator across all dashboard-included environments, with a breakdown by severity.
- Uptime — The minimum uptime percentage across production environments over a rolling 30-day window.
Environments excluded from the dashboard are still fully functional — they just do not affect the project's overall health score.
External Links
Several elements link directly to Rancher for deeper investigation:
- Workload names — Open the deployment, statefulset, or daemonset in the Rancher dashboard.
- Job names — Open the job in Rancher.
- Ingress names — Open the ingress configuration in Rancher.
- Ingress URLs — Open the URL in a new browser tab.
- Vulnerability reports — Open the Trivy report in Rancher.
All external links open in a new browser tab.
Permissions
| Action | Who Can Do It |
|---|---|
| View environments and data | All project members |
| Request a new environment | All project members |
| Request a change to a non-dev environment | All project members |
| Add an environment directly | Platform Managers |
| Remove an environment | Platform Managers |
| Toggle dashboard inclusion | All project members |
| View security reports | All project members |
| Download security CSV | All project members |
Containers
A project's container images — auto-discovered from CI pipelines (code projects) or backed by container-upload repositories (upload projects), with version history and Trivy scan results.
Request Infrastructure
Submitting tickets for new infrastructure resources — AI-assisted parsing, ticket lifecycle, platform team management, and activity tracking.